Zoom classrooms are now provisioned and set up by ATDP staff. Instructors will be added as alternative hosts, and the correct settings should remain in effect whenever you use your assigned Zoom link.
Click to see out-of-date instructions for setting up a Zoom classroom (Last updated Jun 1, 2021)
Virtual classrooms at ATDP now have a required, one-time setup procedure. In the end, you'll have a single link to share and use for access to your Zoom classroom at any time, and you won't have to bother with any further Zoom setup. This configuration provides the greatest flexibility for teachers, as well as meeting UC best practices for security and records retention.
Watch the video guide, or read the step-by-step directions listed below.
Prerequisites
Before setting up your Zoom classroom, you will need:
to have an active appointment (indicated in your onboarding email, which includes your UC Path ID); this should be June 1 for SD, July 1 for ED
to have set up your CalNet account/berkeley.edu email (returning teachers should be able to access their existing accounts)
Steps
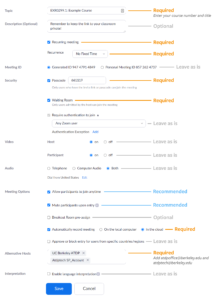
Please follow the steps below to set up your Zoom classroom. Required steps are also outlined in the screenshot, and a detailed walkthrough and discussion is available in the video tutorial.
For instructors teaching multiple class sections: as a preferred practice, we strongly recommend that you repeat steps 5-8 for each section. This will prevent students in one class from accidentally or intentionally interrupting students in another class.
First, go to the Settings section of your account and click on "Recordings."
Enable Cloud Recording on your account by clicking the switch so it turns blue.
Make sure you have the blue check enabled on "Record active speaker, gallery view and shared screen separately" and beneath that, "Gallery view." All other recording settings are optional.
Meeting ID Skip: leave as "Generate Automatically"
Passcode Required: you must use a passcode (the default is OK)
Waiting Room Required: you must use a waiting room
Require authentication to join Skip: leave as "Any Zoom user"
Video Skip: leave both Host and Participant as "on"
Audio Skip: leave as "both"
Allow participants to join anytime Recommended: check to allow students to enter the waiting room before you're there
Mute participants upon entry Recommended: check to require students to unmute before speaking; helps prevent distracting noises
Breakout Room pre-assign Optional: if you know for sure you're going to use the same breakout rooms every day, you can set them up in advance
Automatically record meeting Required: check "In the cloud"
Approve or block entry for users from specific countries/regions Skip: leave unchecked
Alternative Hosts Required: Add atdpoffice@berkeley.edu and atdptech@berkeley.edu; this will email ATDP staff the link to your virtual classroom (so we won't have to bug you for it later), and then we'll list it in families' accounts on the ATDP website. This also allows staff to access your room in case of emergency.
Interpretation Skip: leave unchecked (ATDP students must be able to speak, read, and write in English)
Hit the "Save" button. On the following screen, copy down your Invite Link for your reference. You can always return to the "Meetings" section of your account to find your link.
Finally, to ensure cloud recordings are retained, you must enable your Kaltura account. Go to kaltura.berkeley.edu and log in. In the upper right corner, click on "Guest" and then "Login." (You may or may not need to enter your CalNet credentials again.) When you see your name instead of "guest," you're logged in. That's all you need to do to enable Kaltura!